In 2024 kids gardening is not only for fun; it is an exciting way to bring nature close to children, make them more responsible, and develop a love for the environment. Kids’ gardening has never been more important or rewarding in a world embracing sustainability and eco-friendly practices. This year, kids’ gardening will rise to the occasion with new life as fresh and innovative ideas catch the eyes of the little ones.
This article presents 10 ideas for kids gardening that will inspire creativity, learning, and a lot of outdoor enjoyment through which you can turn your garden into a vibrant, hands-on classroom where the seeds of curiosity and care can grow. Let us explore how you can turn your garden into a vibrant, hands-on classroom where the seeds of curiosity and care can grow!
1. Pot Up Colorful Containers for a Vibrant Garden Display

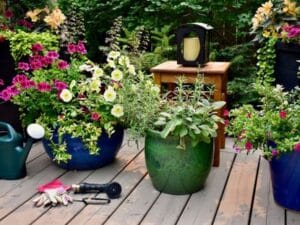
With this kids gardening idea, bring your garden or balcony to life with color-filled pots. This idea is perfect for filling up a small patio with a pop of color here and there or a very spacious yard. To do this, you need a bunch of containers of all different sizes, shapes, and colors—some blooming, some green, and some that trail over the edges.
Be it through bold color mixes or a harmonious palette that matches your surroundings, with these show-stopping containers, arrange and rearrange until you reach a look that fits your style or mood. It’s great for gardeners of any ability; this project will bring creativity and personality to your outdoor living space, making it an interesting and cheery haven.
2.Create Your Own Terrarium Mini-World!

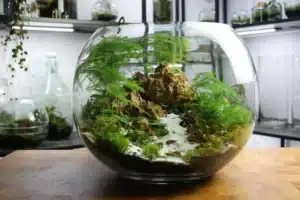
Welcome to the magical world of terrariums! 🌿 A terrarium is like a tiny garden inside a glass container. It’s a perfect project as kids gardening who love nature and want to create their own little ecosystem. Let’s dive into how you can make your very own terrarium mini-world!
Materials Needed for this kids gardening project:
- A clear glass container (like a jar or a fishbowl)
- Small pebbles or gravel
- Activated charcoal (to keep the air fresh)
- Potting soil
- Small plants (like ferns, moss, or succulents)
- Decorative items (like tiny figurines, shells, or stones)
- A spray bottle with water
Steps to Create Your Terrarium:
- Prepare the Container: Start by placing a layer of small pebbles or gravel at the bottom of your glass container. This helps with drainage.
- Add Activated Charcoal: Sprinkle a thin layer of activated charcoal over the pebbles. This keeps the air inside your terrarium fresh and prevents mold.
- Layer the Soil: Add a layer of potting soil on top of the charcoal. Make sure it’s deep enough for your plants to root.
- Plant Your Mini-Garden: Carefully plant your small plants in the soil. Arrange them however you like to create your mini-world. You can mix different types of plants for variety.
- Decorate: Add your decorative items to make your terrarium unique. You can place tiny figurines, shells, or stones to create a scene.
- Water and Care: Lightly mist your terrarium with water using the spray bottle. Be careful not to overwater. Place your terrarium in a spot with indirect sunlight and watch your mini-world thrive!
3. Make a bug box – Simplest kids Gardening Idea.
A bug box is a unique home for insects that you may make yourself. It’s a first rate challenge for youngsters who love insects and want to study more about them. Let’s get started out on making your very own bug field!
Materials Needed for this kids gardening project:
- Small wooden container or container
- Bamboo canes or hole sticks
- Twigs and small branches
- Pine cones
- Straw or dry leaves
- Scissors or pruners
- String or wire
Steps to Create Your Bug Box:
- Prepare the Box: Find a small wood field or box. You can use an antique timber crate or even construct one from scrap wood.
- Fill with Materials: Fill the container with exclusive substances like bamboo canes, hollow sticks, twigs, pine cones, and straw. These substances create hiding spots for bugs.
- Arrange the Materials: Arrange the materials tightly inside the box. Make certain there are plenty of small areas for insects to crawl into.
- Secure the Materials: Use string or twine to stable the substances in location so they don’t fall out.
- Place Your Bug Box: Find a great place for your garden to locate your bug container. It ought to be in a sheltered area, faraway from direct daylight and heavy rain.
- Place Your Bug Box: Find a good spot in your garden to place your bug box. It should be in a sheltered area, away from direct sunlight and heavy rain.
4. Make a pond in a pot

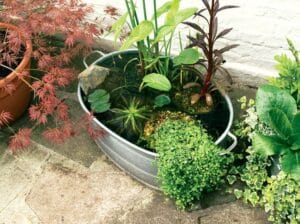
Looking for a cool, muddy trip for the kids this summer? 🌞 Building a swimming pool is the perfect project! Not only will it provide hours of entertainment, but it will also attract birds and insects, providing a peaceful place to observe wildlife. Let’s start building your own miniature pond!
Requirements for this kids gardening project:
- Large shallow container (without drainage holes).
- Pond plants (such as water lilies and border plants) .
- Oxygen-producing plants (for water purification).
- pebbles or boulders
- water
- A shady spot in your garden
Steps to create your container pond:
- Choose your container: Find a large, shallow container. It can be an old bottle, a half bottle, or a waterproof container that can hold water.
- Add stones and plants: Place pebbles or pebbles at the bottom of the container. This helps to anchor the plant. Add plants and oxygenated plants to your pond to keep the water fresh.
- Fill with water: Slowly fill the container with water, making sure not to disturb the plant too much.
- Find the right spot: Place your container pond in a shady spot in your garden. This prevents the water from becoming too hot and promotes algae growth.
- Maintain your pool: Monitor the water and top it up as needed. Enjoy seeing the birds and insects that come to visit your new little ecosystem!
5. Grow Your Own Grass Seat!
Looking for a unique green project for kids this summer? 🌱 How to make lawn chairs! It’s a great way to get kids to garden and provides a comfortable environment. Plus, older kids will love the responsibility of trimming. Let’s get started!
Requirements for this kids gardening project:
- Old metal buckets or spoons
- a drill (for drilling holes) .
- Herbal formulations
- Seeds of grass
- They can have a delicious meal
Steps to make your lawn chair:
- Prepare the container: Take an old metal bucket or barrel and poke several drainage holes in the bottom to prevent leakage.
- Fill with compost: Fill the container to the top with compost, pressing firmly to create a firm base.
- Sow the seeds: Sprinkle grass seeds evenly over the compost. Be sure to cover the entire area for shiny seats.
- Water and wait: Water the seed well and place the container in a sunny spot. Let the compost thaw and watch the grass start to germinate, and it should take about a week in the summer.
- Monitor lawn chairs: Once the grass is thick and shiny, encourage older children to mow it regularly with a mower or scissors. This makes the chair look comfortable and stylish.
6. Make hanging tin-can planters – A creative kid gardening idea.
Kids will revel in this amusing vertical gardening task using recycled tin cans! Start by way of the usage of a hammer and nail to create drainage holes in the backside of every can, after which make a hole close to the top for placing. Get innovative by painting the cans in numerous colorings and allowing them to dry. Once they’re ready, allow the children to decide where to dangle the pots, and then secure them in an area with nails.
Allow your children to pick out their favorite vegetation to develop, fill the cans in part with compost, and plant the seeds or seedlings. Make sure to water the vegetation every day and inspire your youngsters to cast off any lifeless vegetation to hold the whole lot searching colorful and healthy!
7. Grow radishes
Seeing a seed grow into a plant is a magical experience that is sure to inspire children’s love of gardening. Radish seeds are a good option as they germinate quickly, but you may want to try larger seeds like courgettes or runner beans, which should be planted in the ground in a few weeks. Kids will love getting their hands dirty and they can eat many new ones if they grow themselves!
To begin, fill a container with peat-free multipurpose compost and press it down to an even consistency. Encourage children to make holes in the compost with their fingers, about 1 inch deep and 2.5 inches wide. Place a seed in each hole and cover with plenty of compost. Keep the container well watered after planting. Remember that pots can dry out quickly, especially in the winter, so be sure to water plants regularly. The radishes will be ready to harvest in about four to six weeks!
8. Create a succulent plant display
Succulents are perfect for an impressive plant display. They come in a variety of shapes, sizes and colors, making them ideal for creative and eye-catching layouts. Plus, they are easy to care for! Let’s get into how you can make your own delicious plant display.
Requirements for this kids gardening project:
- A shallow container or tray (with drainage holes).
- Water pot mixture
- Different types of water
- ornamental stones or gems
- The garden fingers
- small water or mushroom
Steps to create your luscious display:
- Choose your container: Choose a shallow container or tray with drainage holes. This prevents water retention and root rot.
- Prepare the soil : Fill the container with the sweet potting mix. This type of soil provides good drainage and adequate wetland habitat.
- Arrange your succulents: Organize your arrangement by placing the succulents in a container that you have not yet planted. This lets you see how they look together and make changes.
- Plant the succulents: Once you’re happy with the arrangement, plant each succulent into the soil. Dig the holes with soil or a small spoon and gently place the plants in. Place the soil tightly around each plant and secure it.
- Add decorative stones: Add decorative stones or minerals to the top of the landscape. This not only adds to the appearance, but helps retain moisture and prevent soil erosion.
- Water and care: Lightly water succulents after planting. Succulents don’t need much water, so keep the soil dry between waterings. Place your display in an area with a lot of indirect sunlight.
9.Regrow vegetables from roots
Its a most effective kids gardening ideas ever .For a touch of ‘magic’, try regrowing some of the vegetables and herbs you have offered or harvested out of your lawn. You’ll love seeing the pleasure for your kid’s eyes as they discover that now not the entirety has to begin from a seed; many plants may be regrown from what’s frequently considered waste.
Spring onions and lettuce are particularly simple to regrow—simply area the roots in water. You also can take the base of a celery stalk, place it in water, and watch as new leaves begin to sprout from the center. Once you see this taking place, you may transplant it back into soil for persevered boom.
Regrowing herbs like basil and mint is simply as easy with leftover stems. Simply region them in water, and they will begin to expand roots, making them ready for replanting in soil as soon as the roots have fashioned.
This method isn’t always most effective, interesting and captivating to take a look at, but it additionally enables reducing meals waste and promotes sustainable dwelling, along with supplying monetary benefits!
10. Build a scarecrow as a simple kids Gardening project
Are birds inflicting trouble to your vegetable lawn? A scarecrow might be just the answer you need! While it may not keep all flora and fauna away, a scarecrow can assist deter the pesky birds and add a touch of a laugh on your lawn, mainly for youngsters.
To get started, collect some robust substances like old broomsticks or wood planks to shape the frame of your scarecrow. You may additionally want a few cords or strings to keep the whole thing collectively.
Next, select out some vintage garments to dress your scarecrow. Traditional selections encompass jeans and a button-up shirt, however feel loose to get innovative! Stuff the garments with hay or any other durable cloth to help your scarecrow resist the weather and stand tall to your garden. Top it off with a bucket for a head and a hat, and your scarecrow is ready to do its job!
Summary:
Find some safe kid games in our another blog .


